
Call it what you want: no-knead Dutch oven bread or the world’s easiest crusty bread. Either way, you’re about to make something EPIC all.by.yourself.

Easiest No Knead Bread
I often show up on my Instagram stories making sandwiches from this recipe and even a reel sharing how this no-knead bread recipe is so easy that it fits on a Post-it. Ingredients, directions, and all!
It took my internet and real-life friends for a doozy once they tried it because they couldn’t believe how foolproof the recipe is. So now the time has come for you to make an epic loaf of crusty bread at home.
If this is your first time making it, read the tips in the post, which go beyond the recipe card -they’re the things I explain when I show someone how to make it on FaceTime and in person.
How Long Does it Take to Make Bread at Home
You’ll need about 3 hours to make a loaf of this no-knead bread from start to finish. About two hours are for the dough to rise, then the oven preheats, 45 minutes of baking, and some cool-down time. The great news is that you don’t have to do much work!
Ingredients
The ingredient amounts to make this no knead crusty bread is in the recipe card. Here, you’ll find a few notes next to each ingredient of why it’s used:
- Flour: I use bread flour when I make this bread; however, it also works with all-purpose flour. See my differences below.
- Instant Yeast: often labeled as rapid rise and quick rise yeast only needs to rise once and is what you’ll need for this recipe.
- Water: you’ll need it warm, around 100-110F, to activate the yeast. If it’s too hot, it will kill it. I use my pinky finger to measure.
- Salt: essential to enhance the flavor of the bread. Otherwise, it will taste bland.
All-Purpose Four vs. Bread Flour
Bread flour has a higher protein, 12-14% vs 9-12% in all-purpose, which helps with the development of gluten during the rise, giving your bread a chewy, crumbly texture you love.
What Size Dutch Oven to Use for Baking Bread
I typically recommend a standard, 5qt Dutch Oven, which is about 11 inches wide, when baking bread. This will make a loaf that has some height, giving you that oval bread slice you enjoy. The bigger the pot, the wider and shorter (less tall) the loaf will be.
How to Make No Knead Bread in the Dutch Oven
Making a loaf of bread at home is quite simple; and while the recipe card has directions, here are some additional tips for you:
- Make the dough
Make sure to measure the flour by filling your measuring cup with a spoon or smaller scoop so you don’t measure more than the 3 cups the recipe calls for. Mix all the ingredients in a large bowl or a dough bucket, large enough for the dough to double in size. - Rise
Cover with plastic wrap or a clean kitchen towel to trap the heat in, and let it rise until it doubles in size, for 1.5 to 2 hours, in the warmest spot in your kitchen. - Preheat the oven and the pot
You’ll preheat the oven and the empty Dutchen pot at the same time. Starting with a hot pot ensures that the bread rises during baking and achieves a crusty outer texture you’ll love. - Get it ready
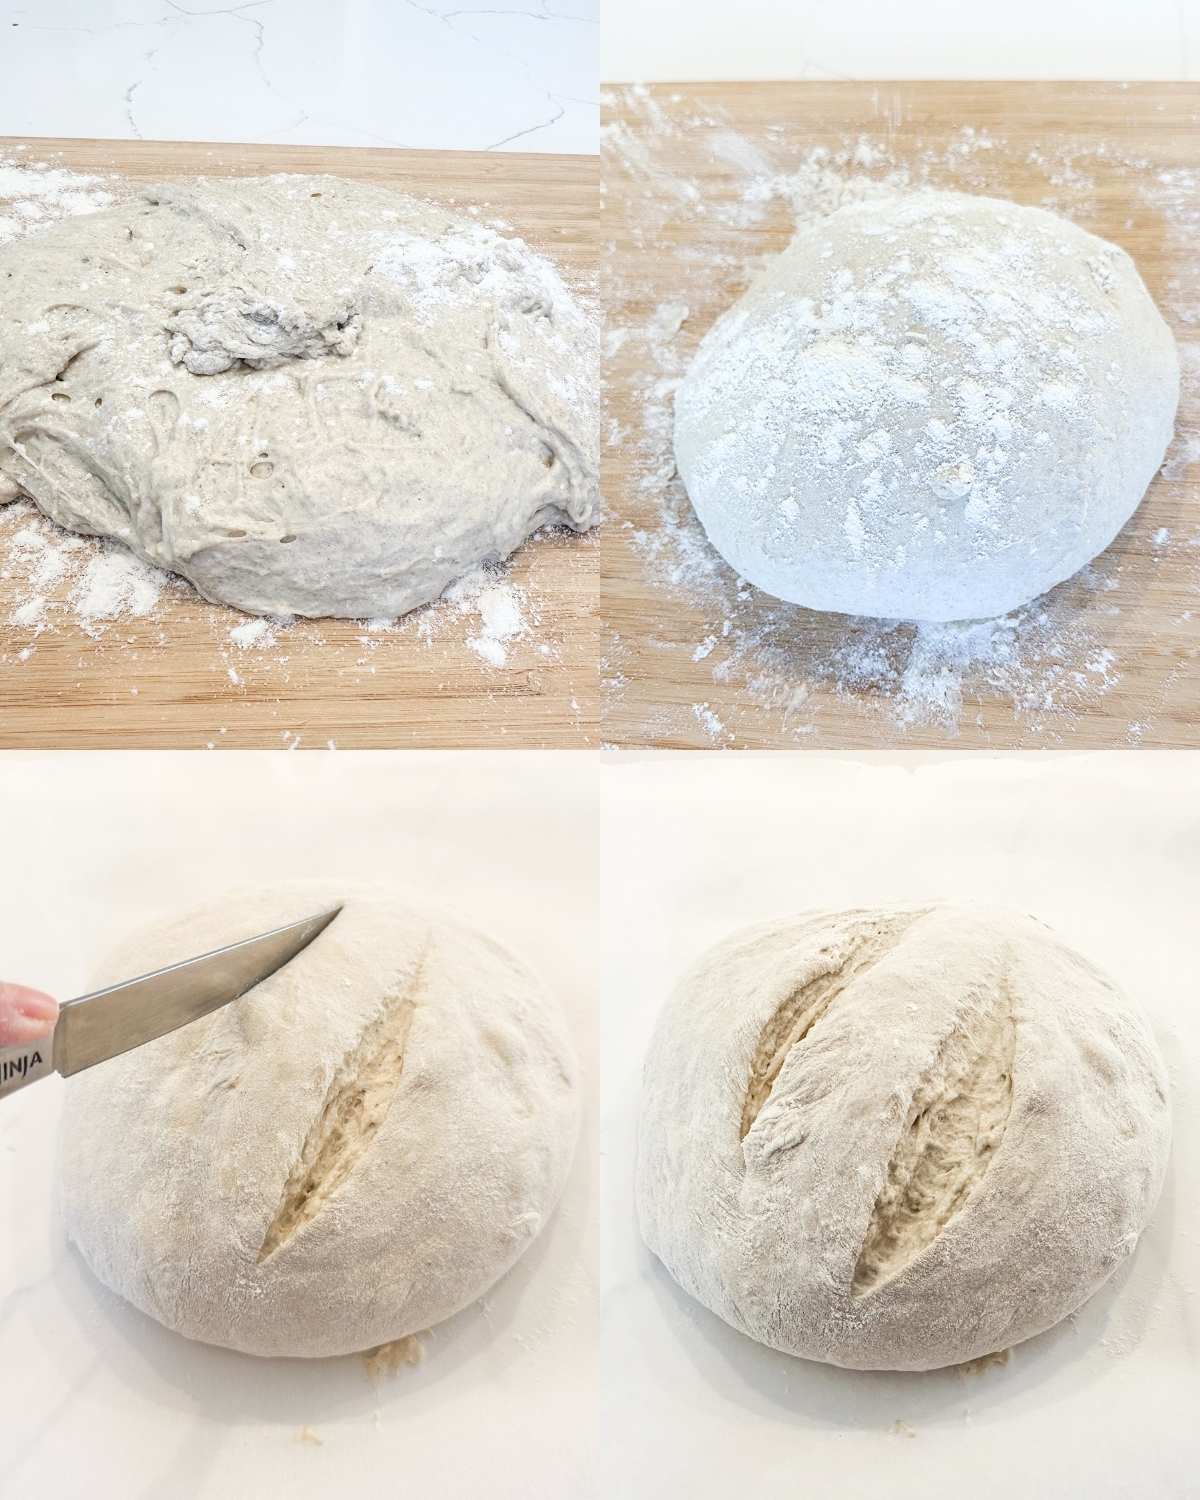
The dough will double in size and be quite sticky. First, add some flour on your counter or onto a wooden board, and then dump the dough there. While this is a no-knead recipe, you’ll need to fold it onto itself, incorporate a little more flour, and shape it into a round ball. Once it’s shaped, put it on top of a piece of parchment paper and score it. - Bake
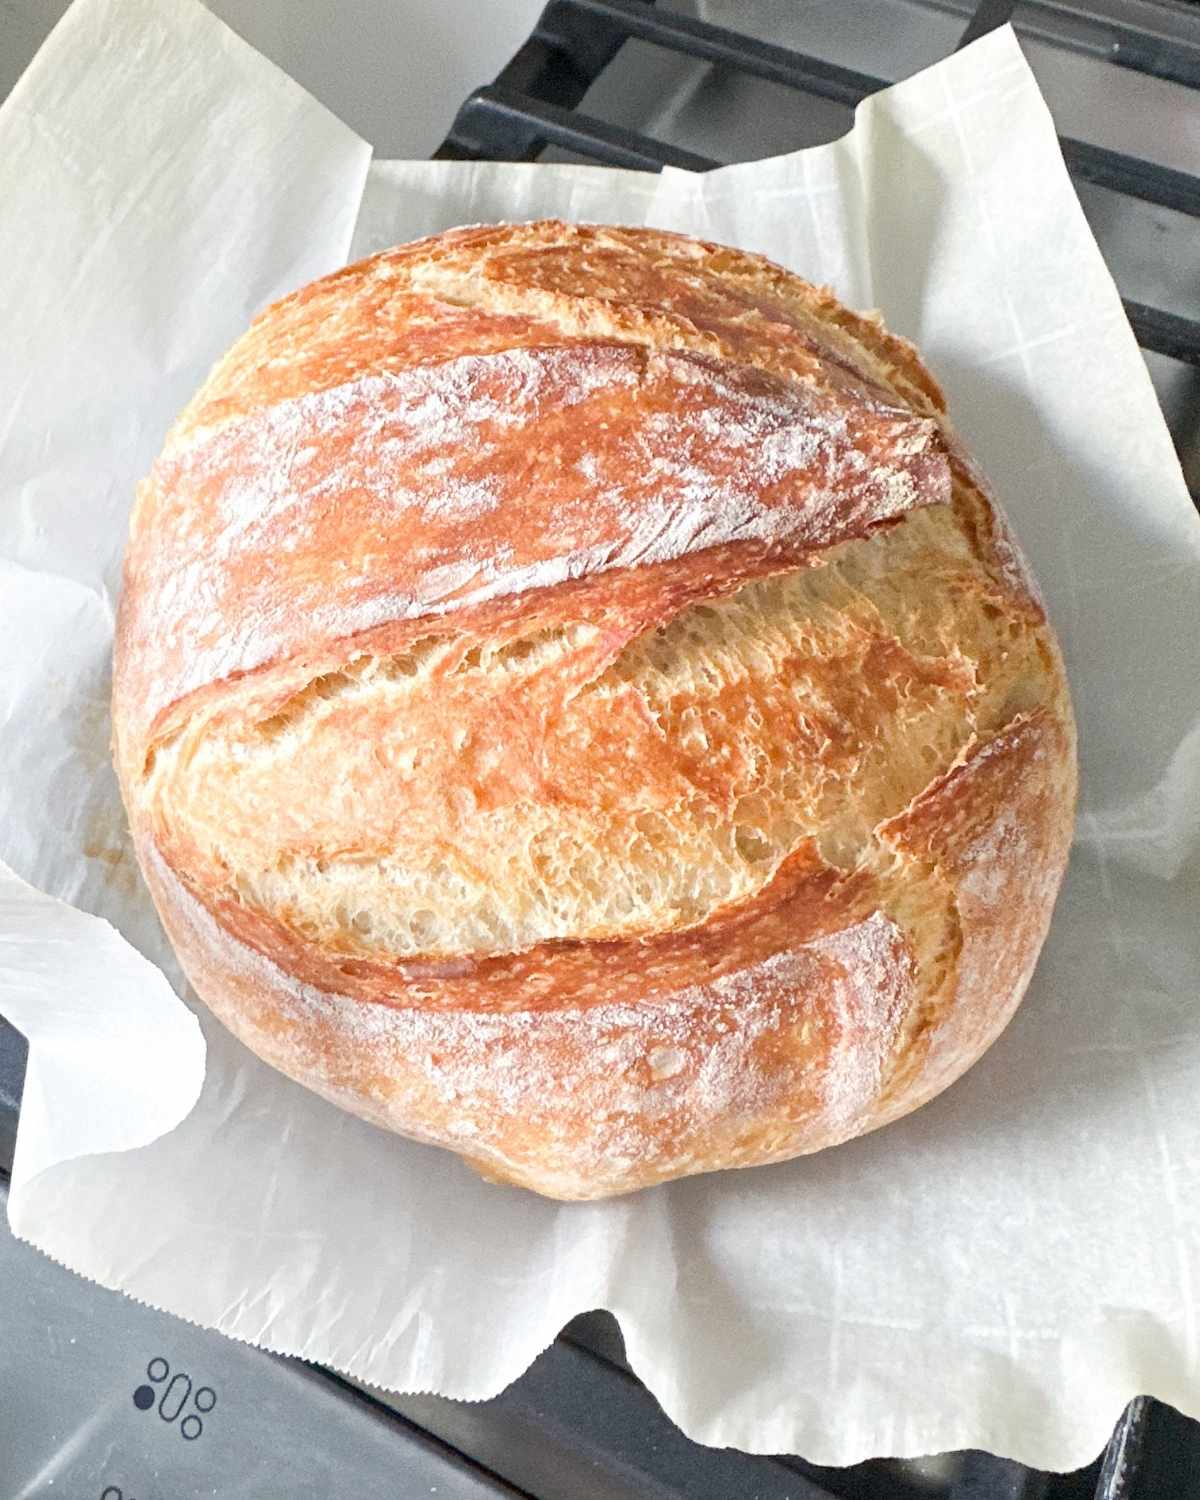
The most important thing to note during baking is that the bread is baked covered, with the lid on, for 30 minutes. After that, you’ll carefully remove the lid from the oven (it’s hot!) and continue baking for 15 more minutes. - Slice
The bread will be quite hot when you remove it from the oven. Let it cool for 10 to 15 minutes in the pot, and then use a bread knife to slice and enjoy it until your heart is content.
Where to Put Bread Dough to Rise
For the dough to rise, you’ll want to place the dough bucket or bowl in the warmest part of your kitchen. If your counter is cold, place the bowl on top of a wooden board or kitchen towel.
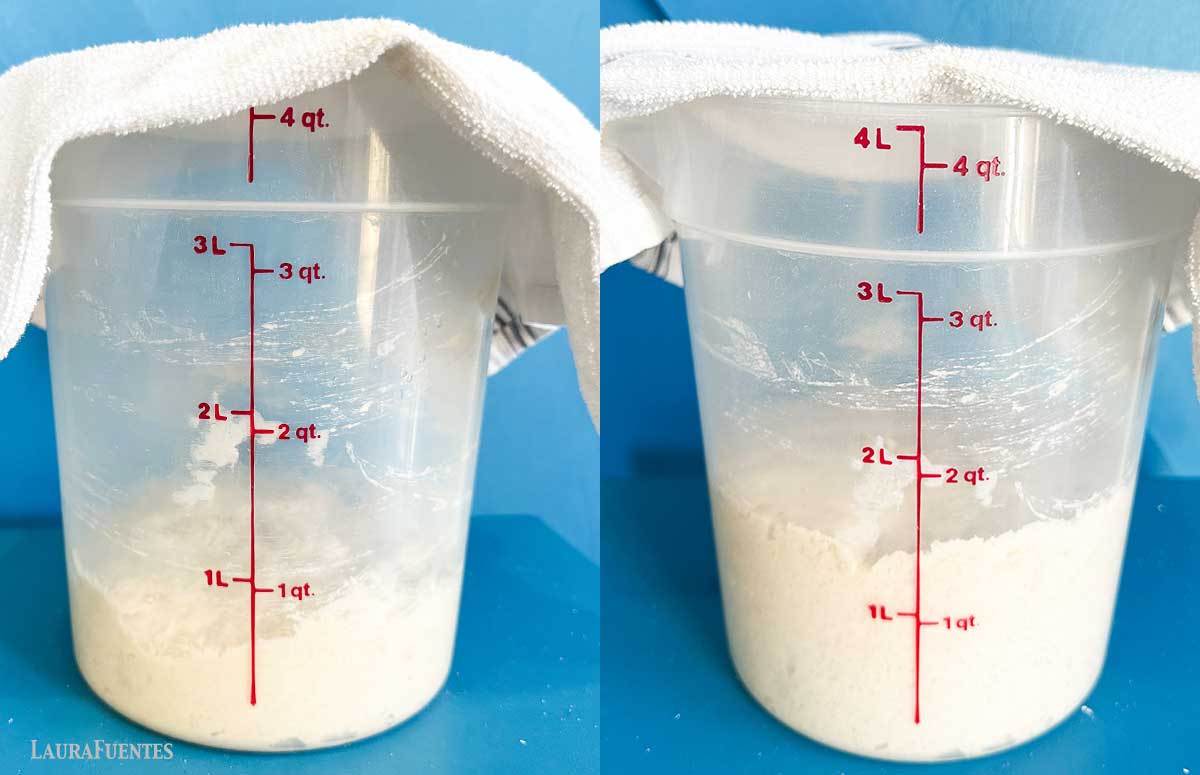
The ideal temperature is anywhere between 75F to 80F. If your home is on the cooler side, don’t worry, it will still rise, but it might take a little longer.
How Long the Dough Needs to Rise
The length of time it will take for the dough to double in size will depend on the temperature of the room and where the dough is located. It can take as little as 1 hour in warmer temperatures and as long as 2 hours on colder days or homes with lower AC temperatures. Give your dough around an hour and a half, give or take, to double.
Forming the Bread Loaf
When you take the dough out of the bowl it will be quite sticky; for this reason, you’ll want to flour the counter first. Then, simply sprinkle more flour here and there, fold the dough onto itself, and shape it until you can form a round ball that no longer sticks to itself.
Dutch Oven Lid on or Off for Baking Bread
The Dutch oven is the perfect pot to bake bread because the lid is also oven-proof! This means that you’ll first bake it with the lid on for 30 minutes where the lid traps the heat and steam from the dough, then remove it carefully, and finish baking it for an additional 15 minutes with the lid off to achieve that crusty texture we all love.
How to Know When the Bread is Done
After a total baking time of 45 minutes, some covered and some uncovered, the bread loaf will be a golden brown color, and the top will sound hollow when you tap on it. If you have a meat thermometer, you can poke it through the top of the loaf (immediately after you remove the pot from the oven), and it should read around 190F.
How to Store This Dutch Oven Bread
Cooled bread leftovers can be stored inside a bread bag or wrapped with a clean kitchen towel for a day or two and stored on the counter or pantry. Freeze this bread whole or pre-sliced for up to 1 month inside a bread bag or freezer-safe zip bag.
No Knead Dutch Oven Bread (For Beginners)

Ingredients
- 3 cups bread flour, more for shaping
- 2 teaspoons instant / quick rise yeast
- 2 teaspoons salt
- 1 ½ cups warm water, +/- 110F
Instructions
Measure and mix:
- In a large bowl, combine the flour, yeast, and salt. Then, add the warm water and using a silicone spatula, mix it in the bowl until all the flour has mixed into a sticky dough.
Rise:
- Cover the bowl with plastic wrap or a clean kitchen towel and place it in the warmest spot of your kitchen or house. Let the dough rise until it has doubled in size. This usually takes about 1 ½ hours.
Preheat the oven & pot:
- When the dough has doubled, place the top oven rack in the middle of the oven and put the Dutch oven pot inside. Preheat the oven to 450F. Let the pot heat up as the oven preheats.
Get it ready:
- Lightly flour your counter or a large wooden board. Dump the sticky bread dough and sprinkle a little more flour on top of the dough. Gently fold it in half a few times into itself, until you can form a round ball of dough that’s no longer sticky.
- Cut a square piece of parchment paper, large enough to fit inside the pot and some of the sides. Place the round ball of dough on top of the parchment paper.
- Using a knife, score the top of the bread. I just do two vertical slits but you can get as creative as you like.
Bake:
- Once the oven has reached 450F, use oven mitts to remove the Dutch oven pot from the oven. Carefully lift the parchment paper and the dough (which will have expanded a bit on the counter) and place it inside the Dutch oven pot. Cover with the lid.
- Bake at 450F with the lid on for 30 minutes. Remove the lid and bake uncovered for an additional 15 minutes. After a total bake time of 45 minutes, the bread will be golden brown. Remove the pot from the oven.
Ready:
- Let this epic crusty bread cool down for 10 minutes before slicing.
Storage:
- Keep it on the counter or in the pantry by wrapping the bread in a clean kitchen towel or inside a bread bag for a day or two. Freeze this bread whole or pre-sliced for up to 1 month inside a bread bag or freezer-safe zip bag.
Notes
The recommendations below may include affiliate links.


Taylor says
The easiest bread recipe ever! Loved that I didn’t even have to knead it!
Herose Nicole says
This is my weakness, baking. But I am so thankful that you shared your recipe on us, I will try to make one again
Sonia Seivwright says
I love recipes like this that fit into real life, especially when you want homemade bread without planning your whole day around it. The idea of letting time do most of the work and ending up with a proper crusty loaf is very appealing.
Ebony says
These are excellent tips and this is perfect for someone like me who is afraid of all the stretch and folds with sour dough. Can’t wait to make this again!
Barbie R says
I love this bread. It’s crunchy on the outside and so soft and yummy throughout. I’ve never made bread before, but my mom used to make this a lot when we were kids. I love it.