
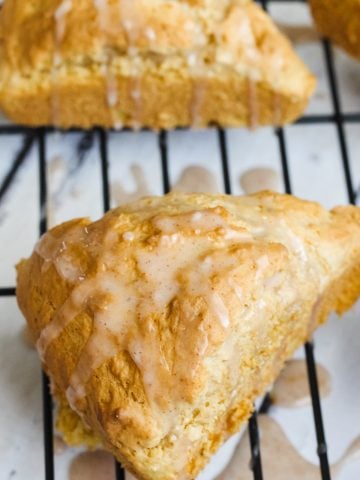
If these scones pictures doesn’t make your mouth water a little, a batch of these scones baking in the oven definitely will.

The Best Pumpkin Scones
These soft, buttery scones with delicious pumpkin flavor are a fall classic you’ll want to bake year-round.
With this easy recipe, scones turn out golden brown, with a perfect texture and fine crumbs inside, and a heavenly cinnamon glaze on top that melts in your mouth.
Pumpkin Scone Ingredients
The ingredients for pumpkin scones are very simple, even down to the Cinnamon Glaze. I don’t recommend making ingredient substitutions if they aren’t noted below. This is due to how finicky scone dough can be, and trust me, I’ve tried it all. Here’s everything you’ll need to make pumpkin scones:
- all-purpose flour: use regular all-purpose flour. To make gluten-free or grain-free scones, check the recipes below this list.
- sugar: gives the scones a mild sweetness.
- baking powder: to rise the dough.
- salt: enhances all the flavors.
- pumpkin spice: or blend of cinnamon, cloves, nutmeg, and ginger
- butter: use frozen butter to work the dough more easily.
- pumpkin puree: adds classic fall flavor and moisture.
- half & half: heavy cream or buttermilk also work.
- egg: bind the ingredients.
For the cinnamon glaze you will need:
- powdered sugar: it dissolves easily with the milk.
- milk: the liquid needed for the glaze. Use your favorite.
- cinnamon: it’s not cinnamon glaze without it!
- pumpkin spice: another fall flavor to top these scones.
I also have a gluten-free pumpkin scone recipe that’s tried and true. It uses a combination of brown rice flour, tapioca starch, and xantham gum.
As I stated above, it’s not as simple as swapping ingredients, but this recipe has the ratios down pact and makes a delicious scone that doesn’t taste gluten-free.
I also have a Grain-Free Paleo Pumpkin Scone Recipe here.

How to Make Easy Pumpkin Scones
With no further ado, let’s get into the science of making the perfect pumpkin scone, or scones for that matter, because yes, baking is science. Here’s the step-by-step:
- Prepare
Preheat the oven to 425F and line a baking sheet with parchment paper or lightly grease a scone pan. - Combine the dry ingredients
In a large bowl combine the flour, sugar, baking powder, salt, and spice. - Cut in the butter
Grate the butter into the dry mixture using a cheese grater. Using your hands combine the butter and flour mixture until it comes together in pea-sized crumbs. - Make the dough
In a separate bowl, whisk the pumpkin, cream, and egg until smooth. Pour the mixture into the dry ingredients and mix until just combined. The dough should be sticky but holds together. A few folds or whirls of the mixer should do the trick, you don’t want to overmix. - Cut into scones
Transfer the dough to a floured surface and make a large circle, about 1-inch thick. Using a knife, slice the circle into 6 to 8 triangles and place onto the baking sheet or a scone pan. If the dough is at room temperature, place it in the refrigerator for 15 minutes or until chilled. - Bake
Bake until they are lightly browned. Remove them from the oven and allow to cool. - Make the glaze
In a medium bowl, combine the sugar, milk, and spices. Whisk until smooth. - Drizzle
Using a spoon, drizzle the glaze over the cooled scones. Serve with a cup of hot coffee and enjoy!
More of a visual learner? Watch this video:
Make next: Pumpkin Brownies
Baking Tips for Perfect Pumpkin Scones
No matter the flavor or recipe, the perfect scone should be:
- Soft and buttery on the inside with fine crumbs
- Crisped golden brown exterior (that’s not tough)
- Domed tops
And if this is your first time, the tips below will produce scones that check all the boxes:
Use frozen butter
Frozen butter will melt as the dough bakes, creating a pocket that gives each scone that soft, tender texture.
Grate the butter
Fine shreds of frozen butter are much easier to work into the flour. The mixture should resemble small pebbles, which means small bits of butter throughout the dough, making a better-tasting scone.
Don’t overmix
Mix the wet and dry ingredients until just combined, so the gluten isn’t overworked and scones don’t turn out tough and chewy.
The gluten in the all-purpose flour is a protein that forms a strong bond with the other ingredients the more it’s worked. This is often the biggest culprit to tough baked goods and scones.
Half & half
The fat and consistency in the cream contribute to the buttery flavor and fine crumbs in baked scones. I don’t recommend a substitute unless it’s buttermilk.
Keep the dough as cold as possible
Scones at room temperature will spread out and flatten. To avoid this, start with cold butter, egg, and cream. You can also refrigerate the dough for 15 minutes prior to baking.
Related: More Pumpkin Breakfast Ideas

Pumpkin Scone Dough Consistency
Pumpkin scone dough should hold together like biscuit dough but slightly stickier. There should be just enough liquid, so the dry ingredients are combined, but wet enough that the dough can rise. You can get a visual example in the video below:
How to Store Pumpkin Scones
If you have leftover pumpkin scones and want to make sure every crumb is savored, there are 2 ways to store scones so you can reheat and enjoy them later in the week.
Store at room temperature
- Place the cooled scones in an airtight container at room temperature for 2 days or refrigerate for up to 4 days.
- Anything past 4 days and they will need to be frozen.
- If you want a warm scone, place them in the microwave for 30 seconds or a 300F oven until heated through.
Freeze baked scones
- Once the scones are cooled and frosted, place them in a freezer-safe zip bag or airtight container.
- Seal and freeze for up to 2 months.
- To reheat, remove the desired amount of scones from the freezer and defrost at room temperature. Warm in the microwave for 30 seconds or a 300F oven until heated through.
What to Serve with Pumpkin Scones
Now that you’ve put in all the hard work, it’s time to enjoy a warm scone with your choice of beverage. This is the part where you can make it a coffee shop experience from the comfort of your home, and I have included a few recipes to help you do just that:
- Iced Coffee
- Café Au Lait
- Hot Cocoa
- Peppermint Hot Chocolate
- Warm coffee or tea
Easy Pumpkin Scones with Cinnamon Glaze

Watch how it’s made:
Ingredients
For the scones:
- 2 cups all-purpose flour
- ½ cup sugar
- 1 tablespoon baking powder
- ½ teaspoon salt
- 1 ½ teaspoons pumpkin spice
- 6 tablespoons butter, frozen
- ½ cup pumpkin puree
- 3 tablespoons half & half
- 1 large egg
For the cinnamon glaze:
- ½ cup powdered sugar
- 3 teaspoons milk
- ½ teaspoon ground cinnamon
- ⅛ teaspoon pumpkin spice
Instructions
For the scones:
- Preheat the oven to 425F and line a baking sheet with parchment paper or lightly grease a scone pan.
- Combine the flour, sugar, baking powder, salt, and spices inside a sifter and sift onto a large bowl or the bowl of your stand mixer. Stir to combine.
- Using a cheese grater, grate the frozen butter into the dry mixture. Combine shredded butter and dry ingredients with your hands until there are no large lumps.
- In a medium bowl, whisk the pumpkin puree, half & half, and egg until combined.
- Fold the wet ingredients into the dry ingredients and mix until just combined. If using a mixer, turn it on low. Be careful not to overmix, the dough should be a bit sticky and not dry.
- Transfer the dough onto a lightly floured surface and make a large round circle about 1-inch thick.
- Using a knife, cut the dough into 6 or 8 triangles, place them onto the lined baking sheet, or spoon the dough into the scone pan.
- Bake the scones for 14 to 16 minutes until they are light brown. Remove from the oven and allow them to cool down before drizzling with the cinnamon glaze.
For the glaze:
- In a medium bowl, whisk the powdered sugar, milk, and spices until smooth.
- Once scones have cooled, drizzle with the glaze. Allow the glaze to harden and enjoy.
Notes
The recommendations below may include affiliate links.


Jessica S says
Can anything be substituted for the cream or buttermilk to make dairy free?
Laura Fuentes says
Definitely! I like using canned coconut milk to make these scones dairy-free. Enjoy!