
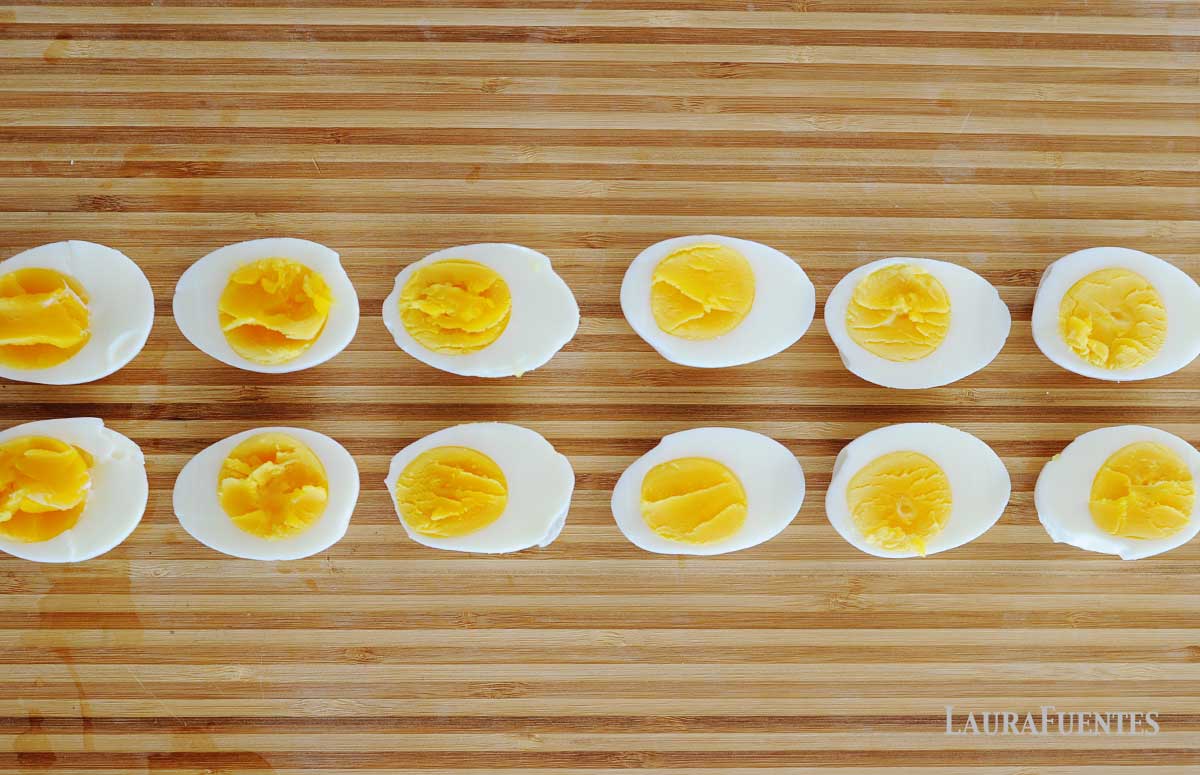
This simple hard-boiled eggs recipe is the secret to perfect, easy-to-peel boiled eggs every single time. It’s a no-fail method that will have you boiling eggs with gorgeous bright yellow yolks and no green lines.
Hard-boiled eggs are a meal prep staple in my kitchen. I use them to make a variety of lunches like avocado egg salad and my kid’s personal favorites, deviled eggs.
In this post, have the solution for cooking hard-boiled eggs at home, plus simple tips to make sure those shells glide right off, let’s get to it!
Easy Peel Boiled Eggs
Making easy-peel hard-boiled eggs happens when you cook and rest them properly. Yes, eggs need a break too 🙂 Here are the most important tips to making perfect, hard-boiled eggs:
Use Week Old Eggs
The best eggs for boiling are at least a week to ten days old. If an egg is fresh, the pH of the white is super low, which causes it to stick to the shell membrane. I recommend purchasing an extra carton of eggs each week, use one for omelets and scrambled eggs, and reserve the extra carton for hard-boiled eggs the next week.
Turn Off the Heat
Perfectly cooked eggs have bright and yellow yolks. I’ve found the method that works best is to bring the eggs and water to a boil, turn off the heat, and let them sit for 13 minutes. This prevents them from overcooking and the yolk getting that not-so-appetizing gray/green ring, a sure sign of an overcooked egg.
Ice Bath
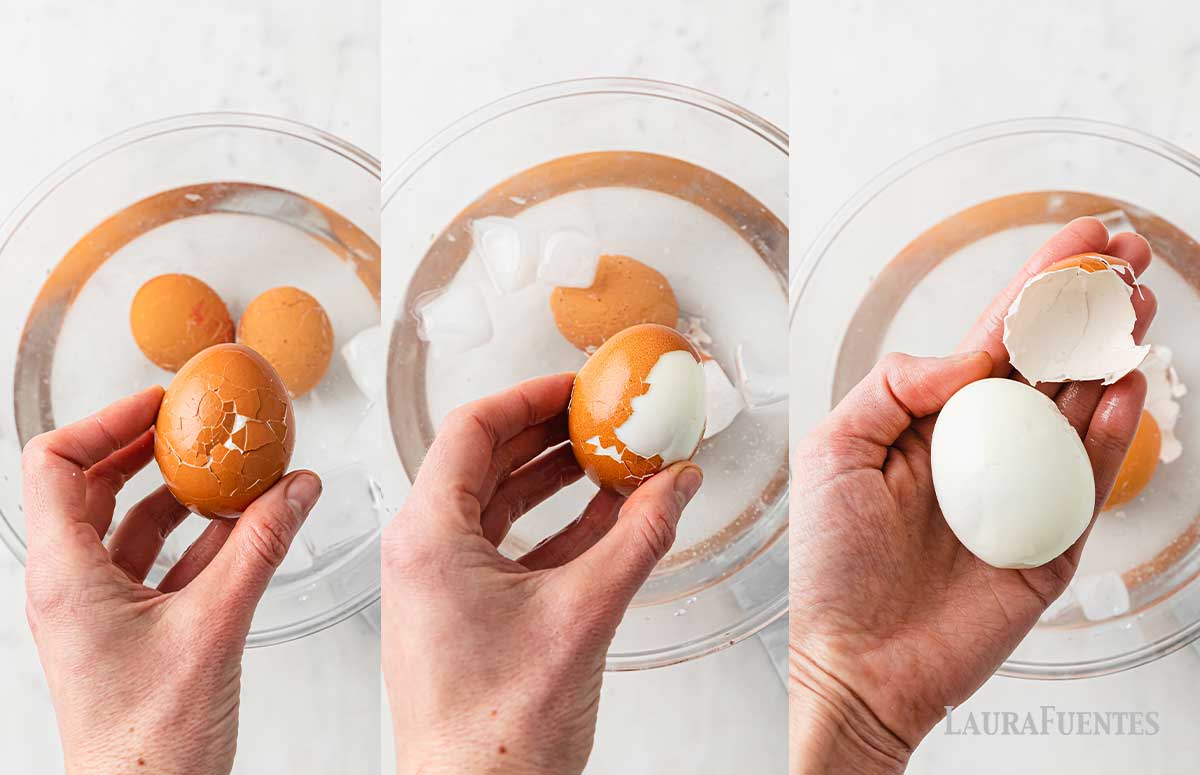
There are several ways to peel hard-boiled eggs, but make sure you give them an ice bath first. The ice-water will “shock” the membrane in between the egg white and the eggshell, loosening the shell and allowing you to peel it off in nearly one piece.
How to Boil Eggs Step-by-Step
Perfectly cooked hard-boiled eggs aren’t difficult - and, when you do it right, not only do you have an exquisitely yellow, tender center but you also have a hard-boiled egg that is easy to peel.
- Cover with water
Set the eggs in the bottom of a large pot or saucepan and cover with cold water by 2 inches. - Bring to a Boil
Set the eggs over medium-high heat and bring to a rolling boil. - Immediately Remove from Heat
Remove the eggs from heat and cover the saucepan with a fitted lid. - Time for 13 minutes
Set a timer for 13 minutes and walk away. The eggs will cook slowly and perfectly in the hot water. - Rest in an Ice Bath
In a large bowl, make an ice water bath. Strain the eggs from the hot water and place them in the cold water for 5 minutes. - Crack and Peel
Carefully crack the eggshells, and gently begin removing the shells, dipping the eggs back in the water, when necessary.
Boiled Eggs – Video Instructions
Need a visual for the recipe above? Check out the video on how to make hard-boiled eggs on the stove-top:
Hard-Boiled Eggs Cooking Time for Easy Peeling
Whether you’re boiling eggs for deviled eggs, lunches or another recipe, timing is everything! For large eggs, you will cook for 13 in hot water. For small or medium size eggs, you can scale down to just 11 minutes.
Once the eggs and water are at a boil, remove the pot from heat, cover with the lid, and set a timer for the entirety of the cooktime, do not boil the whole time. Once you come back the egg whites will be completely set and the yolks cooked just right.
It’s simple and easy recipe tips like this one that help parents pull off mealtimes without a glitch. You’ll find them inside the MOMables Classic Meal Plan. Download a sample meal plan here.
Easy Peel Hard Boiled Eggs
There are a few ways to peel hard-boiled eggs without taking off the shell and in the video below you’ll see me try the most popular methods.
It’s important to keep in mind that making easy-peel eggs starts with using week-old eggs and making sure to soak them in an ice bath, prior to peeling. Once you’ve gotten that out of the way, it’s time to move on to the next step:
Tips for Perfect Hard Boiled Eggs
Aside from cooking right and using week-old eggs, there are a few more tips to keep in mind so you make perfect hard-boiled eggs, every time.
- Don’t Refrigerate- refrigerated hard-boiled eggs will not peel well. Peel your eggs once they’ve been iced and are at room temperature.
- Baking soda- add 1 teaspoon baking soda to the water, it prevents any sticking.
- Peel under running water- the water helps to separate the egg from the shell.
How Long to Store Hard Boiled Eggs
Hard-boiled eggs will stay good for up to 5 days refrigerated in an airtight container. They are definitely one meal prep ingredient I keep on hand to make eggs salad for lunches or a high-protein snack that’s easy to grab before a run or after school sports.
Bonus tip: If you’re wanting to save eggs for longer periods of time, see how to freeze eggs here.
No Fail Easy Peel Hard Boiled Eggs
Ingredients
- Large Eggs
- 1 tablespoon Salt
- Water
Instructions
- Place your raw eggs in a medium saucepan and cover with at least 2 inches of cold water.
- Add 1 tablespoon of salt.
- Place the pan over high heat until it reaches a boil.
- Turn off heat, cover and let it sit for 13 minutes.
- After exactly 13 minutes, remove the eggs from the pan and place them in an ice-water bath and let them cool for five minutes.
- Carefully crack the eggs shells (making sure the majority of the shell is cracked).
- Gently begin removing the shells. The ice-water bath will “shock” the membrane in between the egg-white and the egg shell, loosening the shell and allowing you to peel it off in nearly one piece.
- As needed, you can dip the egg (as you are peeling it) in and out of the water to remove any slivers of shell.
- Serve immediately, use in a recipe or store in your refrigerator for three days.
Notes
Test one egg first, if for some reason it’s a bit undercooked, put eggs back and bring to boil, turn off heat.
You need to fully cover eggs with at least 2 inches of water for this to work. Less water means that it will cool down quicker and your eggs won’t cook throughly.
The recommendations below may include affiliate links.



Thad Mitchell says
Worked like a CHARM! I have never made eggs this easy. Only one of 9 eggs didn’t peel perfectly and I’m pretty sure that is my own fault for being to harsh. Thank you!
Dawn says
We pressure boil our eggs and they usually come out perfect. Put some sort of basket / insert in so the eggs aren’t sitting directly on the bottom. Half cover the eggs with water, seal the pressure cooker and put on med high – high heat until up to pressure and set the timer for 7 min. Once at pressure start timer and back off the heat a tad bit. Once time is up cool immediately under cold water. Once pressure is released then open and cool eggs w cold water (I like to add ice but DH just used cold water). This even works w fresh eggs (with 2 teenage boys I’m lucky if eggs last 3 days before they’re gone, fortunately I collect an average 6 a day from our chickens)
Alan says
there are SO MANY VARIABLES.. how cold was the egg when you started.. my fridge is VERY cold, about 32.003 degrees.. that makes the time it takes to cook to the center longer.. how old the eggs REALLY are.. the chickens diet. etc… I started to let the eggs sit out to room temp before doing anything, or putting them in water for an hour our two before cooking to take some of the cold out.. I use both boughten eggs that are fresh, boughten eggs that have been in the fridge for a couple weeks or a month, and also used our home grown eggs layed by our chickens that eat bugs, seeds and whatever they can find. I have used vinegar in the water, baking soda, or salt.. there seems to be no rhyme or reason to making the perfect egg except luck, although the ice bath IS one of the major things that make them peel easier because of the ‘steam’ or condensation that builds up between the cold shell and the egg, and pushes the membrane away from the cooked egg. I also use Pekin duck eggs, which we raise and REALLY make it easy to peel, and make a perfect egg… just say’n ..
Faye says
I tried this the other day with eggs bought a week ago, except I boiled for two minutes and took of burner to sit for another 12 minutes in hot water. They came out perfect once peeled. Thanks a lot for the tidbit. 🙂
Kelly says
Based on other reviewers that said they were a bit underdone in the center, I let them sit for 14 minutes instead of 13. They are perfect! I have never been able to make hard boiled eggs that are not overdone.
Also, the shells came off very easily…my eggs were bought 5 days ago. However, I do have the organic, cage free eggs. Maybe the previous poster had a point about what our chickens are being fed.
Laura Fuentes says
Kelly, thanks so much for coming back and providing feedback! yes… maybe it’s the food? who knows. glad yours came out great!