This post may contain affiliate links. Read our disclosure policy here.
Below, you’ll find everything you need to know to make a king cake and decorate it, including where to get the baby and colored sprinkles!
Jump to:
The King Cake Mardi Gras Tradition
Traditionally, the King Cake symbolizes the coming of the 3 kings, and its round shape honors each king in the form of a jeweled crown.
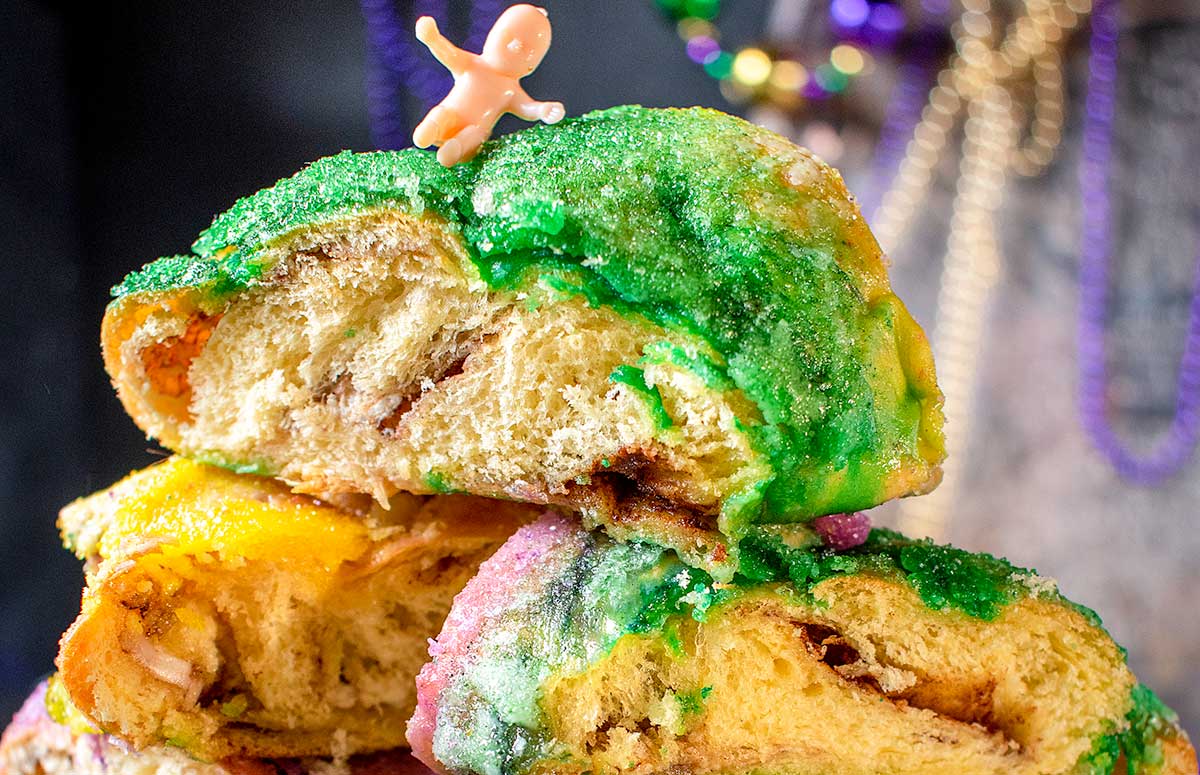
Inside of a king cake, a plastic baby or coin is hidden. The person whose slice includes it is crowned “king for a day” and bound to host the next Mardi Gras party.
When Do You Eat King Cake?
Growing up in Spain, we only enjoyed a king cake on January 6th, the day of the Epiphany. In New Orleans, where I’ve been living since 2000, we enjoy it during “Mardi Gras Season,” beginning on January 6th through Fat Tuesday (the date changes yearly), which typically lasts about 6 weeks.
What Dough is King Cake Made From
King Cake dough is a sweet brioche-like dough that’s also similar to a cinnamon roll. The original version is made with all-purpose flour, although you can also make a Gluten-Free King Cake using this recipe.
Ingredients
A king cake is made with three sets of ingredients: the sweet dough, the cinnamon-sugar filling, and the icing or glaze. You’ll find the amounts for each in the recipe card but here is the reason they’re used:
For the cake:
- All-purpose flour: regular white flour makes the dough of this king cake recipe.
- Instant yeast: rapid rise yeast is an essential ingredient that helps the king cake rise.
- Milk: warmed dairy milk is recommended as the liquid of this sweet bread dough.
- Sugar: white sugar sweetens the dough and activates the yeast.
- Salt: to enhance the flavors of the recipe.
- Eggs: they add protein and moisture to the dough. Using a substitute will change the texture of the dough.
- Butter: a necessary ingredient that adds moisture and fat to the dough.
- Vanilla extract: a classic ingredient in sweet breads.
For the cinnamon filling:
- Butter: melted, helps the cinnamon sugar crumble stay in place.
- Brown sugar: sweetens the filling.
- Cinnamon: an essential flavor of all king cakes!
For the icing or glaze:
- Powdered sugar: the base that makes this icing sweet.
- Vanilla extract: a little to give it flavor. Use clear vanilla if you have it.
- Milk: gives the glaze a brighter white color.
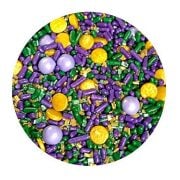
- Colored sanding sugar: for decorating. Classic colors are green, purple, and gold.
How to Make King Cake at Home
Follow the steps below to make this sweet king cake, make the filling while it rises, and then bake it! The printable recipe card below is fully detailed and it includes links to the decorating kits and plastic baby.
- Warm up the milk
The reason the milk is warmed in this recipe is to help dissolve the sugar and help the yeast rise. It’s for this reason that you want to make sure it’s not too hot before adding it to the flour and yeast. Easy to take the temperature with a meat thermometer. - Mix dry ingredients
In the bowl of your stand mixer and using the paddle attachment, you’ll combine some of the flour and yeast, reserving the rest of the flour for a later step. - Add the wet ingredients
Once the sweet milk has cooled down enough but it’s still warm, you’ll add it to the dry ingredients. Then, you’ll add the eggs, one at a time. - Knead in the stand mixer
You’ll need to switch the paddle attachment to the dough hook because you’re about to knead the dough for almost 10 minutes to stretch the dough fibers and activate the gluten. - Shape on the counter
In this step, you’re simply taking the dough out of the stand mixer onto a floured surface and knead it a few times by hand to shape it into a ball. - First Rise
This happens in a large greased bowl, so the dough can easily rise, covered with plastic wrap to retain heat and moisture. Place it in the warmest spot of your kitchen to rise, until it doubles in size. - Make the filling
Make the cinnamon sugar filling while the dough is rising and set it aside so it’s ready in the next step. - Shape the dough
Once the dough has risen, take it out of the bowl onto a floured surface. You’ll knead it a few times to tighten it and then roll it out in a rectangular shape. - Spread the filling
Distribute the cinnamon sugar crumbly filling throughout the surface of the dough. - Roll it up
Similar to making traditional cinnamon rolls, you’ll roll the dough from the longest end to make a log. - Transfer & shape it
Place the log on a parchment-lined baking sheet and shape it into a round or oval-shaped cake. - Second Rise
The dough will rise shaped directly on the baking sheet for 45 minutues. You’ll want to cover it with a large kitchen towel or plastic wrap. - Bake
Position the oven’s top rack in the middle of the oven so the king cake isn’t too hot to the heat source. If baking at a high altitude, add a water-filled ramekin to add moisture to the air. Bake the king cake in the preheated oven for about 30 to 35 minutes. - Cool completely
You’ll want to cool down the king cake completely before icing, otherwise, the icing and the sanding sugars will not stay in place. - Decorate
You’ll want to decorate the king cake directly on the platter or cutting board you’ll be using to serve it. Hide the baby and then distribute the icing on top of the king cake and sprinkle the colored sanding sugars.
Decorating a King Cake
It’s best to decorate the king cake once it’s cooled down to room temperature and on the platter or board you’ll use to slice it. Once the cake is glazed, it’s very difficult to move.
I recommend lifting the cake with parchment from the baking sheet onto the board and then peeling off the old, used parchment.
Once the king cake is in place, hide the baby, and simply spread the icing over the cake and sprinkle the colored icing sugars. You can also tint the white icing in purple, green, and gold colors.
King Cake Glaze
The king cake glaze is a simple mixture of powdered sugar, milk, and vanilla. Some king cakes use colored icing in Mardi Gras colors of green, purple, and gold, while others glaze it white and sprinkle colored sanding sugar on top. I personally prefer the colored sanding sugars. This Mardi Gras decorating set includes colored sugars and babies, enough for several cakes!
How to Hide the Baby in the King Cake
The easy way to hide the baby under a king cake is to lift it on one side and place the baby from underneath. It’s important that you hide the plastic baby after the king cake has been baked and cooled.
How to Store King Cake
Store leftover king cake by wrapping it tightly in plastic wrap or inside an air-tight container for up to 3 days. If it feels a little dry, microwave each slice for 10 seconds before serving
King Cake Recipe (Beginner Friendly)
Ingredients
Dough:
- 3 ½ cups all-purpose flour, divided
- 2 ¼ teaspoons Rapid Rise yeast, 1 package
- 1 cup milk, 120º to 130º
- ¼ cup sugar
- 1 teaspoon salt
- 2 eggs
- 6 tablespoons unsalted butter, cubed and softened
- 1 teaspoon vanilla extract
Cinnamon Filling:
- ⅔ cup packed brown sugar
- 2 teaspoons ground cinnamon
- 3 tablespoons unsalted butter, softened
Icing:
- 1 cup powdered sugar
- 1 tablespoon milk
- ½ teaspoon vanilla
Instructions
Make the dough:
- In a small saucepan over medium-low heat, warm up the milk, sugar, and salt long enough to dissolve the sugar, and warm it up to 120-130F. If it’s hotter than that, let it cool down to that temperature range before you pour it into the flour and yeast.
- In the bowl of the stand mixer, add 2 ½ cups of flour and the yeast. Give it a mix using the paddle attachment, on low for about 30 seconds.
- With the mixer on low, add the milk mixture, once cooled down to the right temperature, and vanilla, until it’s incorporated. Add the eggs, one at a time, and mix until a stringy/shaggy dough forms.
- Switch the paddle attachment to the dough hook and slowly add the remaining 1 cup of flour, adding a little more if needed to make a soft dough.
- Add the softened butter, a few pieces at a time, while kneading until each piece is absorbed. Then, knead on low speed for 10 minutes, adjusting the dough moisture if needed by adding ¼ teaspoon to the sides or a few sprays of water with a misting bottle, and stopping the machine to scrape the sides if needed.
- Transfer the dough out of the stand mixer bowl onto a floured surface. Knead it a few times with your hands until it’s smooth and elastic enough to be shaped into a round ball of dough.
First rise:
- Grease the sides of a large bowl with butter, a little oil, or spray, and place the dough inside. Cover with plastic wrap and let it rise until it’s doubled in size, about 1 to 1.5h on the counter -this can vary based on the ambient temperature.
- Meanwhile, make the cinnamon filling in a small bowl by combining the brown sugar, cinnamon, and softened butter with your hands, to create a crumbly cinnamon mixture.
Shape and fill the dough:
- Remove the dough from the bowl onto a floured surface and knead it a few times. Shape it into a large rectangle, about 10×16 inches in size.
- Distribute the cinnamon sugar filling over the rectangular dough.
- Beginning on one of the long ends, roll the dough into a log. Lift the log and transfer it onto a parchment-lined baking sheet. Shape it into a ring, pinching the seams lightly to seal the ends. With scissors, cut slits along the top of the ring, to let the steam out while baking.
Second rise:
- Cover the baking sheet and the shaped dough with a large, clean kitchen towel or with plastic wrap and let it rise for 45 minutes.
Bake the King Cake:
- Preheat the oven to 350F and position the top baking rack in the middle of the oven. You don’t want the king cake too high, see notes for high-altitude baking.
- Bake the king cake in the preheated oven for 30-35 minutes until the top is golden and the internal temperature of the king cake is between 180F and 190F. You can use a meat thermometer for this. Remove it from the oven and let it fully cool down before icing.
Decorate the King Cake:
- Mix the icing ingredients in a bowl.
- Transfer the cooled king cake onto a tray, board, or platter you plan on using to serve it on.
- Hide the baby, if using, in the cake by lifting it from the bottom and pushing the king cake baby into the king cake.
- Pour the white icing generously over the king cake, and sprinkle with colored sugars.
Storage:
- Keep the King Cake on the counter up to overnight if planning on serving it the next day. Store leftover king cake or slices by wrapping them with plastic wrap or inside an air-tight container for up to 3 days. If it feels a little dry, microwave each slice for 10 seconds before serving.
Notes
An easy way to transfer the king cake from the baking sheet to the serving board is by lifting it with the parchment paper. Then, peel off the paper once in place.


Nutrition


Rachel says
The ultimate king cake recipe.
lucy says
Great king cake recipe.
Dayna says
So yummy!!!
Erika says
This classic king cake recipe was fantastic. Last year we paid $80 to have one shipped to Colorado and while it was good.. it’ wasn’t “that” good. I’ll be using this recipe from now on!
Carla says
This was the perfect King cake recipe!
Jackie says
So good!
Justine says
This recipe tasted AMAZING. For some reason, my dough was hard to roll out into a rectangle. I do believe I reached the dimensions in the recipe, but after baking it, the ring was too small and ended up kind of all coming together in the center. After icing it, you really couldn’t tell any difference and it ended up looking like a round bread cake vs a ring cake. But my family couldn’t stop raving – it was delicious.
Sarah James says
Hands down, the easiest way to make a Mardi grass King Cake recipe if you don’t want to buy it. I’ve tried others and nobody explains it as easy as you do. Thank you!
Christina says
Can I make the dough the night before?
Laura Fuentes says
Yes. refrigerate overnight on the final rise.
Barbara Schieving says
Love the video. Your dough was great, so easy to work with and forgiving. Your little was adorable in the background! Great job!
Chichi says
Wow, I hope you save me some for tomorrow…looks delicious!!!!!!!!!!
Laura says
We make a new one 🙂
Lori @ RecipeGirl says
Looks easy enough! Love that your kiddo popped in to talk about the tree 🙂 It didn’t even faze you!
Laura says
First time on camera. totally trying to tune it out -although I was trying to not laugh because I was ready to pee my pants! my kid telling me that he saw a fallen tree (branches) and then saying ‘thank you’ for me making him a king cake. totally hilarious