
This post may contain affiliate links. Read our disclosure policy here.
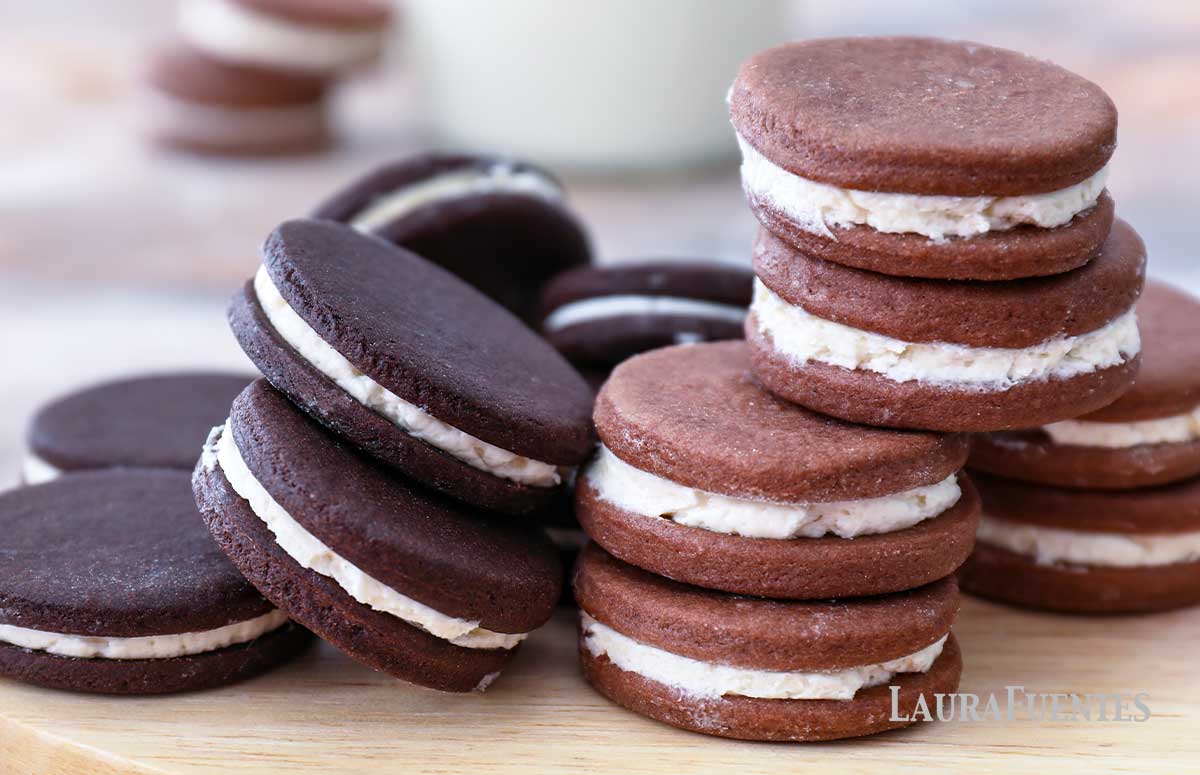
With this recipe, you can enjoy gluten-free homemade Oreos that are dairy-free, too! Perfect for a simple dessert that satisfies the craving like the real deal!
This homemade Oreo recipe proves that eating gluten-free desserts can be simple to make and crazy good to eat.

Can You Make Dairy-Free, Gluten-Free Oreos?
Absolutely! Not only can you make them, but you can enjoy separating the cookie and licking the filling too! Gone are the days when having to eat gluten-free meant skipping out on all the “fun” foods.
This recipe doesn’t only meet dairy-free and gluten-free dietary needs, but it also tastes amazing.
Ingredients
Here are all the simple ingredients that are needed to make both the cookies and the filling of the recipe:
- Plant-based vegan butter: this will be used in the cookies and the filling.
- White sugar: for sweetness.
- Salt: just a little bit is needed.
- Egg: helps to bind together the dry ingredients to form the cookie dough.
- All-purpose gluten-free flour: I prefer this 1:1 all-purpose gluten-free flour because it always performs.
- Unsweetened dark cocoa powder: this adds a good chocolate flavor and a dark coloring to the cookies. Traditional cocoa powder works too.
- Baking soda: adds a bit of fluffiness to the cookies as they bake.
- Powdered sugar: used to sweeten and make the filling.
- Vanilla: pure vanilla extract adds delicious flavor.
Below you’ll find a printable recipe with the measurements and step-by-step directions.
Is Regular or Dark Cocoa Better?
If you want the cookies to turn out dark and have that deep chocolate flavor, dark cocoa powder is a better option. Performance-wise, both traditional cocoa powder and dark will work.
As a bonus, dark cocoa powder also has more antioxidants, and slightly more calcium, so it’s a win-win, and now you can say that chocolate/cocoa IS healthy for you!
How to Make Gluten & Dairy-Free Oreos
Are you ready to see the simple process? Have your ingredients handy and follow the step-by-step directions listed below:
- Start the Cookie Dough
In a large bowl, cream together the softened butter with the white sugar and salt until light and fluffy. Add the egg and beat until fully incorporated.
In another bowl, sieve the flour, cocoa powder, and baking soda. Mix to combine well. - Mix the ingredients
Add the dry ingredients to the wet ingredients, and mix with a spatula together until combined. - Form dough balls
Place a large piece of plastic wrap on the counter and transfer the dough on top. With your hands, form a dough ball or square. Wrap it with plastic wrap and refrigerate to chill for 1 hour. - Preheat the oven
Preheat the oven to 325˚F (160˚C) and line a baking sheet with parchment paper. - Divide the dough
Remove the dough from the fridge, and with a knife, divide the dough ball into 2 pieces. Return the other half, wrapped, to the fridge to keep chilled while you roll and cut out the first batch of cookies. - Roll the dough
Place half of the dough between two sheets of parchment paper and roll it to ¼-inch (½-cm) thickness. - Use a cookie cutter
Using a small round cookie cutter (of 1 ½ to 2 inches in diameter), cut out as many cookies as you can and place them directly on the parchment-lined baking sheet. - Repeat
Pack together and re-roll out any scraps to cut additional cookies. Repeat this process with the other half of the remaining dough from the fridge. - Bake
Bake in a preheated oven for 15 minutes. Remove from the oven and transfer cookies to a cooling rack to cool completely.
Make the filling & assemble cookies: - Make the filling
Combine plant-based vegan butter, powdered sugar, and vanilla in a medium mixing bowl. Beat together until light and fluffy. - Assemble to cookies
Assemble the cookies by spreading a generous scoop of the icing onto one of the fully cooled cookies and sandwiching it with another. Give it a light squeeze and scrape any excess off to clear and even out the sides
Pro Tip
You can make the cookies or filling or both in advance and bake or assemble them later. Make sure to store the filling in the refrigerator if made in advance, and let it come to room temperature before filling the cookies for easier spreading.
Storing Gluten-Free Oreos
These simple Oreo cookies need to be stored in an airtight container and kept in the fridge for up to a week or in a zip bag at room temperature for up to 3 days.
More Gluten-Free, Dairy-Free Desserts
Gluten-Free Dairy-Free Oreos

Ingredients
For the cookies:
For the filling:
- ¼ cup plant-based vegan butter, softened
- 1 cup powdered sugar
- ½ teaspoon vanilla
Instructions
Make the cookie dough:
- In a large bowl, cream together the softened butter with the white sugar and salt until light and fluffy. Add the egg and beat until fully incorporated.
- In another bowl, sieve the flour, cocoa powder, and baking soda. Mix to combine well.
- Add the dry ingredients to the wet ingredients, and mix with a spatula together until combined.
- Place a large piece of plastic wrap on the counter and transfer the dough on top. With your hands, form a dough ball or square. Wrap it with the plastic wrap and refrigerate to chill for 1 hour.
- Preheat the oven to 325˚F (160˚C) and line a baking sheet with parchment paper.
- Remove the dough from the fridge, and with a knife, divide the dough ball into 2 pieces. Return the other half, wrapped, to the fridge to keep chilled while you roll and cut out the first batch of cookies.
- Place half of the dough between two sheets of parchment paper and roll it to ¼-inch (½-cm) thickness.
- Using a small round cookie cutter (of 1 ½ to 2 inches in diameter), cut out as many cookies as you can and place them directly on the parchment-lined baking sheet.
- Pack together and re-roll out any scraps to cut additional cookies. Repeat this process with the other half of the remaining dough from the fridge.
- Bake in a preheated oven for 15 minutes. Remove from the oven and transfer cookies to a cooling rack to cool completely.
Make the filling & assemble cookies:
- Combine plant-based vegan butter, powdered sugar, and vanilla in a medium mixing bowl. Beat together until light and fluffy.
- Assemble the cookies by spreading a generous scoop of the icing onto one of the fully cooled cookies and sandwiching it with another. Give it a light squeeze and scrape any excess off to clear and even out the sides.


Lola says
I love oreo but I have gluten intolarence. I’m so happy that I found this recipe, definitely giving it a try this week.
Darla says
I loved your homemade oreos recipe so when I saw you made them in a gluten free version I knew I had to give them a try! Absolutely delish!
Zara C says
These GF Oreos are soooo much better than any store bought I have been able to find for my daughter!!
Emily says
My kids love oreos but now we’re going gluten-free so this recipe is exactly what we needed!! Delicious!! Thankfully, nobody will miss their favorite chocolate cookies!!
Jenn says
I used the dark cocoa to make these gluten free Oreos and they turned out great!