
A cauliflower pizza crust that doesn’t disappoint needs to have crisp edges and be able to hold the sauce and loads of toppings!
Today’s recipe delivers just that and more with a beginner-friendly recipe made with cauliflower rice below. There’s also a step-by-step video if this is your first time!
Jump to:
- Healthy, Low-Carb Cauliflower Rice Crust for Pizza
- Ingredients
- How to Make Pizza Crust with Cauliflower Rice
- What Does Cauliflower Rice Pizza Crust Taste Like?
- Cooking Tips
- Is Cauliflower Pizza Crust Healthy?
- Healthy Pizza Toppings
- How to Freeze and Reheat Cauliflower Rice Crusts
- Beginner-friendly Cauliflower Rice Pizza Crust
Healthy, Low-Carb Cauliflower Rice Crust for Pizza
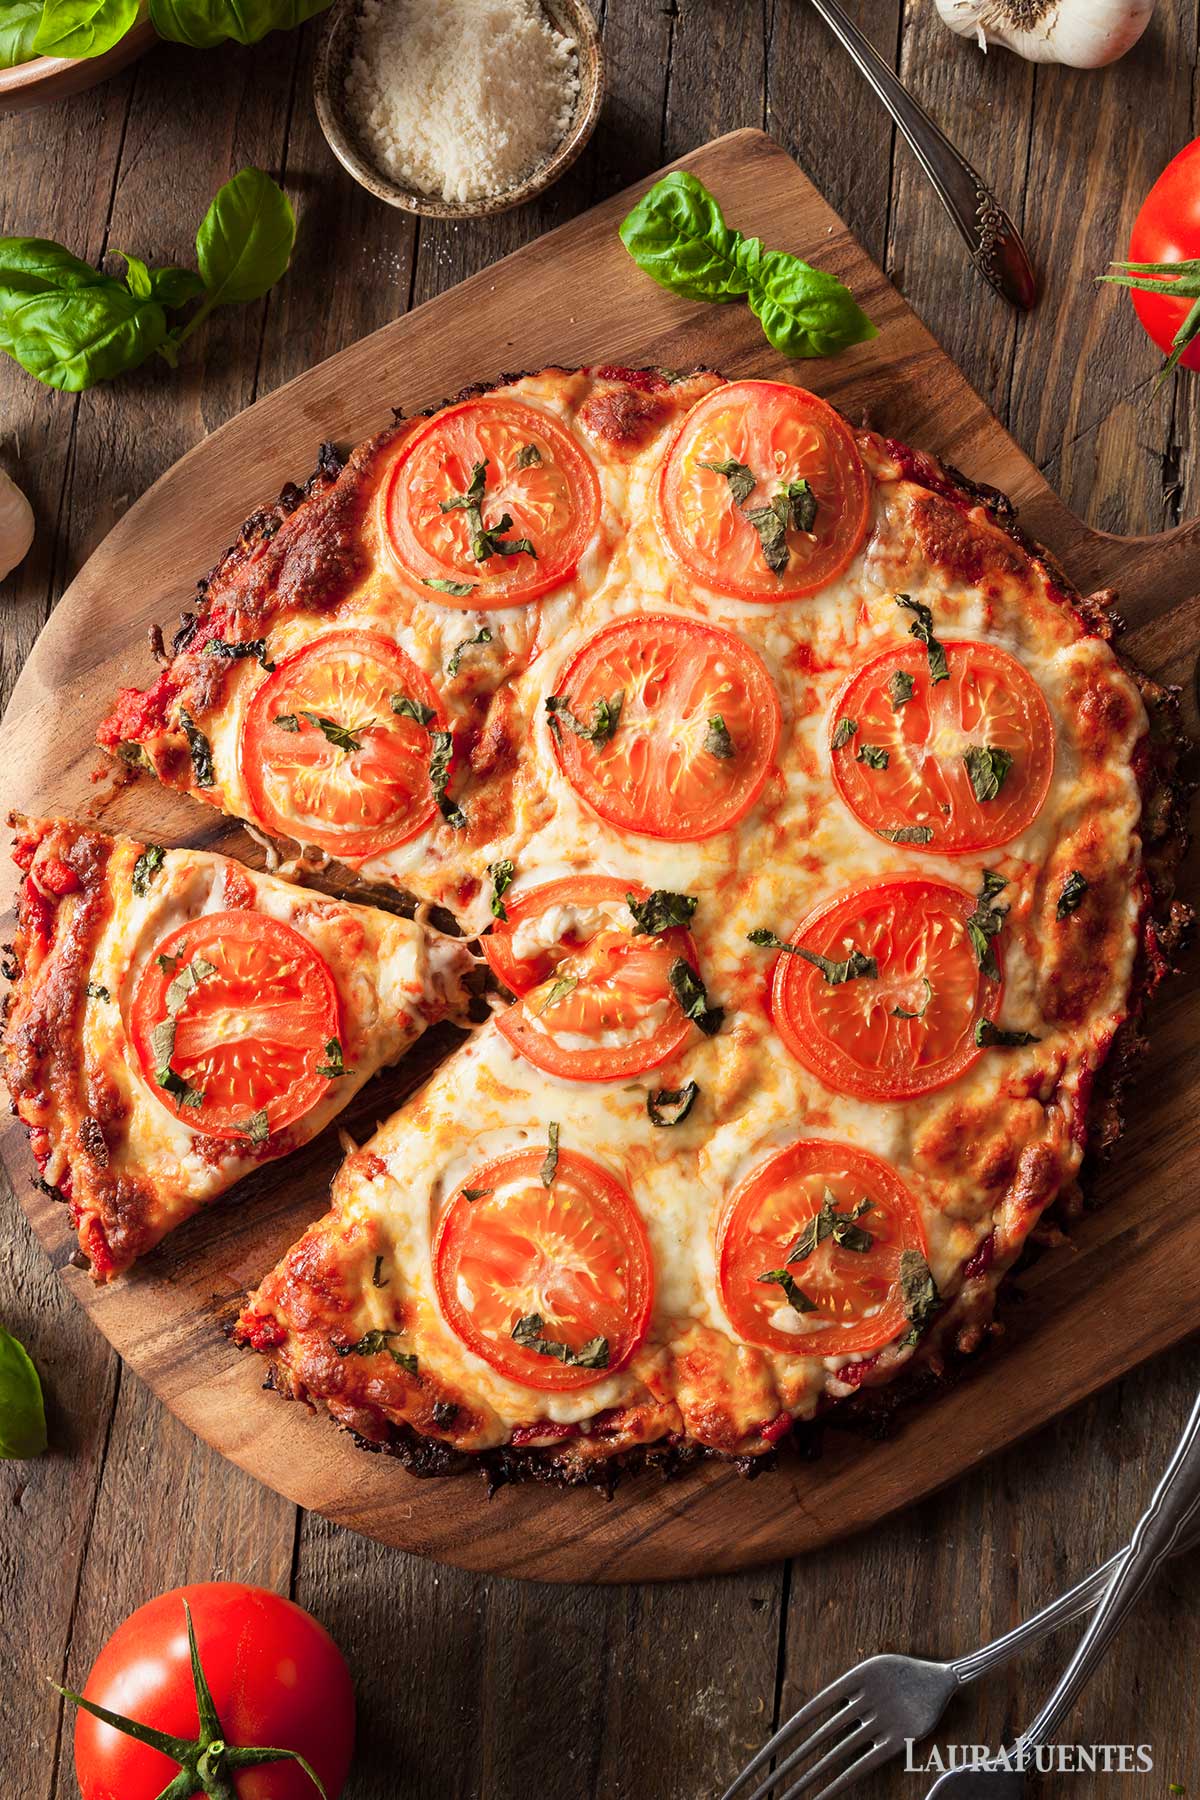
This healthy pizza crust is a dream for anyone who is low-carb, grain-free, gluten-free or wants to try a cauliflower rice crust. Made with only 3 ingredients, including cauliflower rice, its flavors, and durability can hold any combination of ingredients.
While this recipe can’t replace the chewy, bready texture of traditional pizza crust, it’s in a league of its own.
You can load up the toppings, slice it, and hold this cauliflower rice pizza crust with your hands like a regular pizza!
Finding a low-carb pizza crust this good is a phenomenon, and I’m here to deliver just that, plus additional tips on topping and freezing this recipe for future enjoyment.
Ingredients
The ingredients required for this low-carb pizza crust include:
- Cauliflower: use homemade cauliflower rice or pre-made. If using frozen, read the tips below to squeeze out the moisture!
- Eggs: essential for binding the ingredients. They hold the riced cauliflower “grains” together.
- Creole seasoning: or your favorite seasoning blend, like Italian seasoning to add flavor.
You’ll find the ingredient measurements in the recipe card at the end of this post.

How to Make Pizza Crust with Cauliflower Rice
Making cauliflower pizza crust is a simple process that’s thankfully much quicker than traditional pizza dough. Essentially, you can enjoy pizza in a fraction of the time. To make this low-carb pizza crust you’ll need to:
- Prep
Preheat the oven to 375F and place the oven racks on the center shelf. Line 2 baking sheets with parchment paper. - Rice the cauliflower and cook it
Whether you choose to turn cauliflower into rice at home or buy it pre-riced at the store, you’ll need to steam it. Microwaving is the quickest option. You can also roast it or sauté it. - Ring out excess moisture
Allow the cooked cauliflower rice to cool down to room temperature before transferring it to a large (and clean) kitchen towel or cheesecloth. Close tightly and ring out the excess water. This is essential to helping the crusts form and let them get crispy. - Mix it all together
Place the riced cauliflower in a large mixing bowl, and add the eggs and seasonings. Adding some seasoning is essential to making cauliflower taste good. Use a fork to whisk everything together until the eggs and cauliflower are evenly distributed. - Shape
Scoop ½ cupful of the mixture onto the lined baking sheets. Press down each mound with your hands to create a circle-shaped base. Repeat with the remaining mixture until you have 8 bases total. - Bake
Bake both trays for 10 minutes, remove them from the oven, and carefully flip each pizza base. Switch the tray positions and bake for an additional 7 minutes. - Make a pizza!
Remove from the oven and allow them to cool slightly before topping them with sauce, cheese, and toppings. Bake until the cheese melts, and enjoy!
If this is your first time making these pizza crusts made with cauliflower rice, watch this quick step-by-step video:
What Does Cauliflower Rice Pizza Crust Taste Like?
Without adding any seasonings, your cauliflower pizza crust will be rather plain, which is ok since you’ll be enjoying the cheese and toppings. However, to up the flavor, I like to add garlic powder, at a minimum, or my ultimate seasoning pick: creole seasoning.
Cooking Tips
Check out these extra tips to ensure perfect cauliflower pizza crusts.
How to keep the crust from getting soggy
To prevent your crust from having a soggy texture, it’s really important that you ring out all excess moisture after the cauliflower is steamed and cooled. I like using a regular kitchen towel or cheesecloth since paper towels will tear.
Cook the cauliflower rice long enough
For the crust to be tender, the cauliflower must be steamed until it’s tender.
Flatten them out
To guarantee, the best texture, press each cauliflower crust round to a ¼-inch thickness.
Rest the crust
Before loading the freshly baked cauliflower crust with toppings, let it cool down to room temperature. As it cools, it will crispen up and be a more sturdy base.
Is Cauliflower Pizza Crust Healthy?
As a veggie-packed pizza base that’s low-carb and grain-free, this cauliflower pizza crust is a healthy choice and one you can enjoy. While it doesn’t have the same texture as regular pizza dough, the flavor and texture are still enjoyable with your favorite pizza ingredients.
Is Cauliflower Rice Crust Keto?
Each cauliflower pizza round packs only 1 gram of carbohydrates, making them a keto-friendly option!
However, the kind of toppings you place on the crust also determines whether it’s a low-carb choice. So stick to ingredients like cheese, protein, and leafy vegetables.

Can I Use Frozen Cauliflower Rice to Make a Pizza Crust?
You can use that frozen cauliflower rice to make this recipe without needing to thaw it first! Simply place it frozen in a microwave-safe bowl, cook it until tender, and make sure to ring out all the water moisture once it’s cooled.
Healthy Pizza Toppings
You can top these homemade cauliflower crusts any way you like, but if you are looking for ideas, here are several ways to make a mouthwatering pizza with healthy toppings.
- Caprese: sliced tomato + mozzarella cheese + fresh basil. Finish with a drizzle of balsamic glaze.
- Meat lovers: tomato sauce + cheese + pepperoni + cooked sausage crumbles + bacon.
- Greek: olive oil + oregano + mozzarella + feta cheese + kalamata olives + sliced green bell pepper
- Veggie lovers: shredded cheese + chopped spinach + sliced mushrooms +sliced bell pepper + black olives.
- Italian: basil pesto + mozzarella cheese + fresh sliced tomato.
- Cobb Salad Pizza: tomato sauce + cheese + bacon + classic cobb salad toppings.
How to Freeze and Reheat Cauliflower Rice Crusts
This cauliflower crust is a freezer-friendly option and so easy to do.
Prepare the crusts and allow them to cool down to room temperature. Wrap each crust with foil and place them in a freezer bag. Freeze for up to 6 months.
To reheat or bake, top the frozen crust with your choice of pizza toppings, and bake in a 400F oven for 15 minutes or until the cheese is melted and the crust is golden-crisp.
Beginner-friendly Cauliflower Rice Pizza Crust

Watch how it’s made:
Ingredients
- 1 medium cauliflower, finely riced to 3 packed cups
- 3 eggs
- 1 teaspoon creole seasoning, or your favorite seasoning mix
Instructions
- Preheat oven to 375F and position oven racks in the middle of the oven. Line two baking sheets with parchment paper.
- Clean cauliflower and place flouters inside the food processor. Turn on food processor and chop it finely, finer than rice.
- Place riced cauliflower in a large microwavable dish. Cook for 3 minutes, stir, and cook for an additional 1 minute. Allow cauliflower to cool down to room temperature.
- Place cooled cauliflower inside a large cheesecloth or kitchen towel. Close and ring out excess water. Transfer cauliflower back into large dish or bowl.
- Add eggs and seasoning to cauliflower. Using a fork, whisk the eggs and seasoning into the cauliflower until it’s evenly distributed.
- Scoop out approximately ½ cup of mixture onto the parchment lined pan. Press down with your hands to create a circle shaped base. Repeat process and form 8 pizza bases, 4 in each tray.
- Bake trays 10 minutes, remove from oven, carefully lift and flip each pita base, switch tray positions, and bake and additional 7 minutes.
- Remove from oven and transfer to a wire rack.
- Spread sauce, toppings, and cheese over grain free base and bake for approximately 7 minutes, until cheese is melted.
The recommendations below may include affiliate links.


Jessica says
This recipe worked out really well. I wanted a recipe that did not have lots of cheese like most low carb pizza crust out there nowadays. I will say that one definitely needs to ring out the grated cauliflower very well so the base is perfectly crispy. My second batch came out better because I think my riced cauliflower was less moist. Thanks for all the tips.
Chris says
Not a good time to be cleansing! These look amazing. I have a huge head of cauliflower in the fridge begging for this recipe! I am going to make as many as my cauliflower head will allow and then freeze! When cleansing is done, I’m feasting on hummus and pittas, pizza, garlic bread…yes, I’m a bit hungry and a huge bit excited!
Laura Fuentes says
I can never stick to a cleanse. good for you! if you plan on freezing these, ring out as much as the water as possible (change the towel, ring a second time) for best results. Enjoy!
Beth says
These look great, and simple! When eating them from frozen, do they get soggy when thawed? Also, if making pizzas from frozen pitas, would you thaw them first, or could you just add toppings and the baking would thaw them?
Laura Fuentes says
Beth, they do have a “soggyness” to them when you thaw them. I toast them first, then bake them and make pizzas.